Wrote a Python program to take a YouTube URL, extract and convert the audio to a MP3 file. It has a minimalist GUI. It requires tkinter, youtube-dl (a Linux command line tool), and ffmpeg.
import os
import subprocess

import tkinter as tk
from tkinter import filedialog

# Create the GUI window
window = tk.Tk()
window.title("YouTube Downloader")

# Create a function to be called when the user clicks the "Download" button
def download_video():
  # Get the URL of the YouTube video from the user's input
  url = url_entry.get()
  # Download the video using youtube-dl
  subprocess.run(["youtube-dl", url])
  # Get the filename of the video from youtube-dl's output
  video_filename = subprocess.run(["youtube-dl", "--get-filename", url], capture_output=True).stdout.strip().decode("utf-8")
  # Prompt the user to select a location and filename for the MP3 file
  mp3_filename = filedialog.asksaveasfilename(defaultextension=".mp3")
  # Convert the video to an MP3 file using ffmpeg
  subprocess.run(["ffmpeg", "-i", video_filename, mp3_filename])

# Create a label and text entry field for the URL
url_label = tk.Label(text="Enter the URL of the YouTube video:")
url_entry = tk.Entry()

# Create a button to start the download
download_button = tk.Button(text="Download", command=download_video)

# Place the widgets in the GUI window
url_label.pack()
url_entry.pack()
download_button.pack()

# Run the GUI event loop
window.mainloop()
I wrote a Bash Script to remove excess periods in a filename. For example, if you had a file named “some.words.in.your.filename.txt”, this script will assist in renaming it to “some words in your filename.txt”. Of course, this only works in Linux. You need to save the file below as a .sh and make it executable via the chmod command. Click “Read More” to see the code.
#!/bin/bash

# Get the filename argument
filename="$1"

# Get the extension of the filename
extension="${filename##*.}"

# Remove the extension from the filename
filename="${filename%.*}"

# Replace all dots in the filename with spaces
new_filename="${filename//./ }.$extension"

# Print the suggested new filename
echo "Suggested new filename: $new_filename"

# Prompt the user for confirmation
read -p "Do you want to rename the file? (y/n) " choice

if [[ $choice == "y" || $choice == "Y" ]]; then
    # Rename the file
    mv "$1" "$new_filename"
    echo "File renamed to $new_filename"
else
    echo "File not renamed"
fi
Thought it might be more helpful to go in a bit more detail (also so I won’t forget).
One day, when I get time (yea right) I want to make a custom satellite tracker. The thought is to use inexpensive Raspberry Pi and an Arduino to do the stepper control. I would run gpredict on the Pi, and write a serial string containing the azimuth and elevation data to the Arduino. I would ssh/vnc into the Pi to select the satellite I wanted to point to. The Arduino would have a cheap inclinometer and compass connected and would simply use a control loop to move the device via stepper motors until the the position data matches the target. The first step is to compute the pointing data.
Gpredict does a good job of this. So, we now need to get the pointing data out of gpredict in a fashion we can send to an Arudino. This method basically uses rotctld as a pass-thru and only uses a small fraction of its functionality (not really how it was intended to be used).
I updated my method of raising and lowering my ham radio tower. The tower is about 50 feet tall. I added a Harbor Freight winch which allows me to raise and lower the tower from a safe distance.
Cutting a batch of card stock on a K40 laser. Normally, I would secure it better, but in this application, it don’t matter. The frames for for a school craft.
Now that I have both a VHF/UHF and now a HF antenna analyzer, I figured it would be a worthy investment to get a decent Harbor Freight “Pelican Case” for them. However, I couldn’t stop there. Figured I’d have some fun with the laser making some labels for the box. I also laser’ed my name and contact info in the paint of the actual analyzers as well.
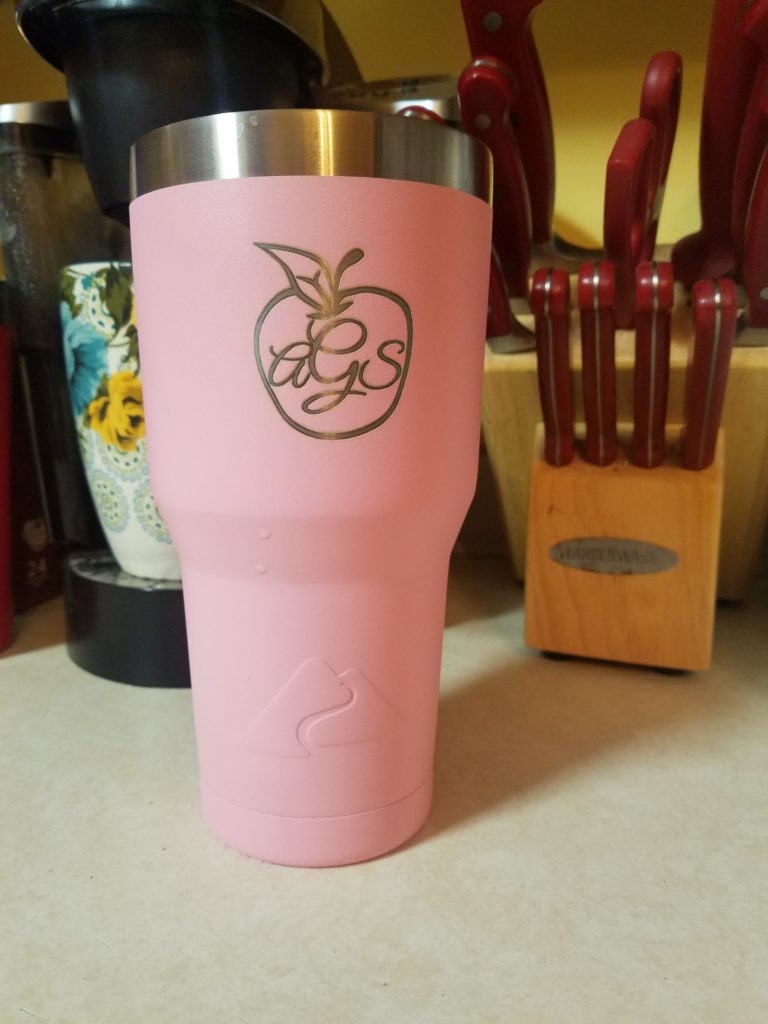
Laser cut a tumbler for my wife (who is the Librarian at the local Elementary School). I’m finding I like the ease of engraving on the pre-painted tumblers.
Cut my wife out a pencil holder, using the K40 Whisperer software (http://www.scorchworks.com/K40whisperer/k40whisperer.html). Highly recommend the software over what comes with the unit. I was running in Linux, and had some difficulty getting all the dependencies straight (a few more to sort out than what were in the directions). But worth it. Forgive the photos, they are somewhat out of focus.
I love my laser cutter/engraver. However, I don’t think it is for everyone, serious care needs to be taken to mitigate some serious issues. Here are some rambling thoughts.
View this thing as kit. Do not think of it as a plug and play or turn key.
The grounding on this thing is crazy. The high voltage supplies on these things are often grounded to chassis. So, if anything ever goes wrong with your house ground, or an internal ground, you’d find out about it when you touch it and wake up dead. Also, the resistance between your house ground rod and the device is probably enough cause problems. Plan on modifying grounds to make this thing safe. If this doesn’t make immediate sense to you, don’t buy this thing.
In keeping in mind with the above, drive a ground rod dedicated for this thing. Ground the laser cutter’s chassis to it with heavy gauge wire. Use the ground rod! Make sure it stays connected.
This thing can blind you instantaneously from only reflections. You can’t see the laser light, so it can lull you in a false sense of security.
It does not even come with a micro-switch to cut off laser power if you open up the lid. Don’t say, “I’m not stupid enough to open the thing when in use, so I’m good.” One, yes you are that stupid, you are human. Two, you might not the only one that comes in contact with the machine. It would be hard to live with blinding some youngern (perhaps your own). INSTALL A MICRO SWITCH. I just put a micro-switch inline with the laser enable wire, that kills power to the laser if the door opens.
I WILL NOT BE IN THE ROOM WITH THE THING WITHOUT WEARING WAVELENGTH RATED LASER GOGGLES. If anyone else is in the room, make them wear googles too. This thing was made in China, as cheaply as possible. Think about it.
You are an idiot if you you don’t have a fire extinguisher handy.
Installing an e-stop is a good idea.
Air assist is not an option or a luxury. Consider it safety gear. It keeps fires to a minimum, and greatly increases the quality of the cut/engraving. You can buy aftermarket nozzles, or focusing heads for dirt cheap.
Get a water separator for your air assist. I didn’t do this, and ruined a lens. Lens are not expensive, but you don’t want to loose the cutter right when you want to use it. Probably not a bad idea to have a spare lens lying around the shop.
Do not max out the current. I rarely go over 10 mA. Laser tubes are expensive.
A flow switch for your coolant circuit is a good idea. Tie it in to an e-stop, that way if you stop flowing water with the stupid little aquarium pump, it will cut off the machine before toasting a couple hundred dollar laser tube.
Propylene Glycol is your friend in your coolant. Even the food grade stuff is pretty cheap. You don’t want water to freeze in your laser tube. Remember, it is just glass. Winter, I keep water flowing to prevent freezing. Spend some time considering how to prevent water from freezing in your laser tube.
Don’t use tap water. Buy the distilled water. It don’t cost much. Not worth risking your water being conductive, and having the high voltage arc around. Can’t image anything good coming from that.
The platform that comes with the device is crap. Plan on making your own.
Learned this weekend the joys of custom jigs to hold your work piece. Take the time to make one, if you plan on making more than one of something.
I typically use 1/8″ door skins for my wood cutting and engraving. The laser will blow right thru it on one pass. I set my speed around 8 mm/s. Again, air assist is your friend.
If you are looking for things to cut, Dollar Tree is your friend.
Spend time with your exhaust system. The one that comes with the device is worthless. Just replace it. You do not want to be breathing most of the things you are cutting. Many ply-woods have glue that is formaldehyde based. It’s what cancer smells like.
I’ll sometimes use dry-molly to mark metal. It is MUCH cheaper than CerMark. However, no telling what this will do if you eat it. I can’t image it will do anything good to you. Clean it and then clean it again. Rubbing alcohol seems to take off the excess pretty good.
Don’t cut in your house. You want to do this in a detached building from the one you live in. Perhaps a garage, but this is iffy.
A respirator is a good thing to have around. When in doubt, wear it.
I moved and replaced the micro-switches used to zero the table. You can get a few extra inches out of the device if you put some time into this. Especially, if you modify the exhaust duct that goes way to far into the cutting area.
Put a web-camera inside the cutting area. It makes watching the cutting process much more pleasant and safe.
One of the first things I cut was a “laser in use, do not enter” sign. Not a bad idea to have one, and hang it on the door when using the machine.
The software that comes with it sometimes has a mind of its own. On occasion, mine will finish an engraving.. and for some reason move over and down about an inch and start engraving over again. This software will do stupid stuff. You’ll get used to it, but you will ruin work pieces. Don’t put anything irreplaceable in it.
Make some sort of a log for the settings you use on various materials.
If you are not comfortable doing modifications like this, this thing isn’t for you.
K40 Whisperer is your friend. I wasted far too much time using the buggy software that came with it. Ditch it. Ditch it as fast as you can. K40 Whisperer makes the experience MUCH, MUCH more pleasant. I’m even toying with putting it on a Raspberry Pi, and a touch screen. Nice stuff.
Despite all the above, it is great fun. I’d buy it again if I had it to do over. I enjoyed modifying the cutter/engraver almost as much as using it. But view it as a kit. Don’t forget how cheap a piece of kit it is. The tube is around a couple hundred bucks, so they didn’t spend much money on the rest of the cutter. … but it is a freaking 40 (30 really) watt laser that mere mortals can afford.
This thing is kinda a death trap, so no warranties expressed or implied on the accuracy, completeness, or safety of my comments above. This is all at your own risk. You are buying a cheap laser from China. Your safety is your responsibility, not mine or anyone else. Don’t rely on some random person on the internet to keep you safe.
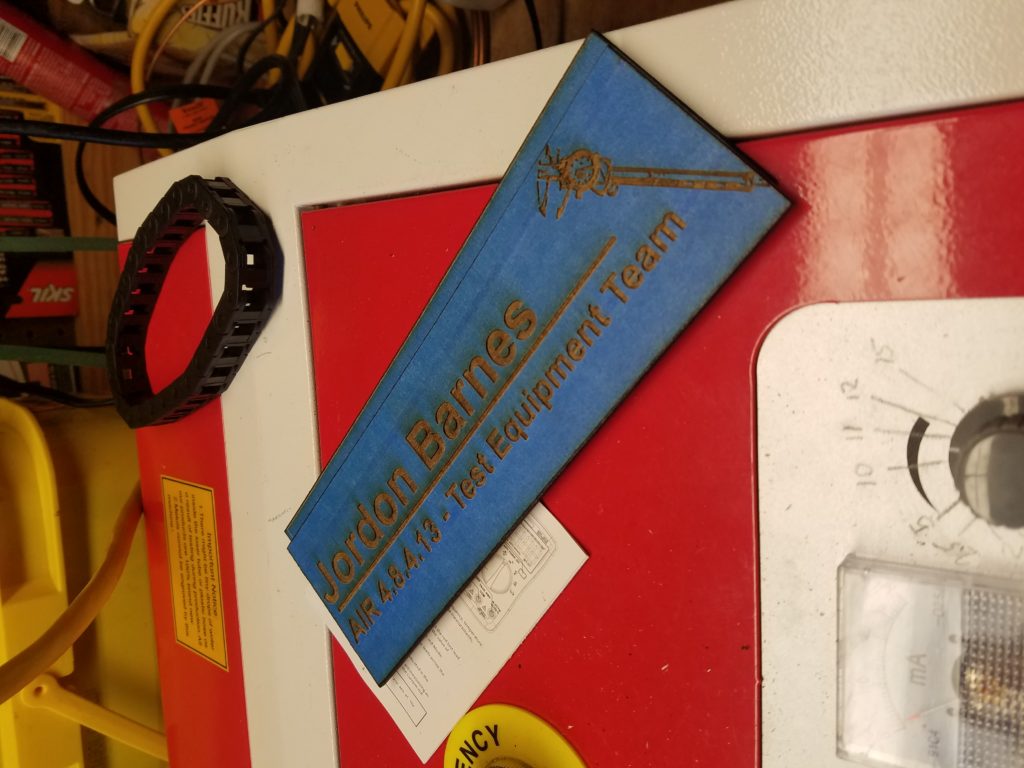
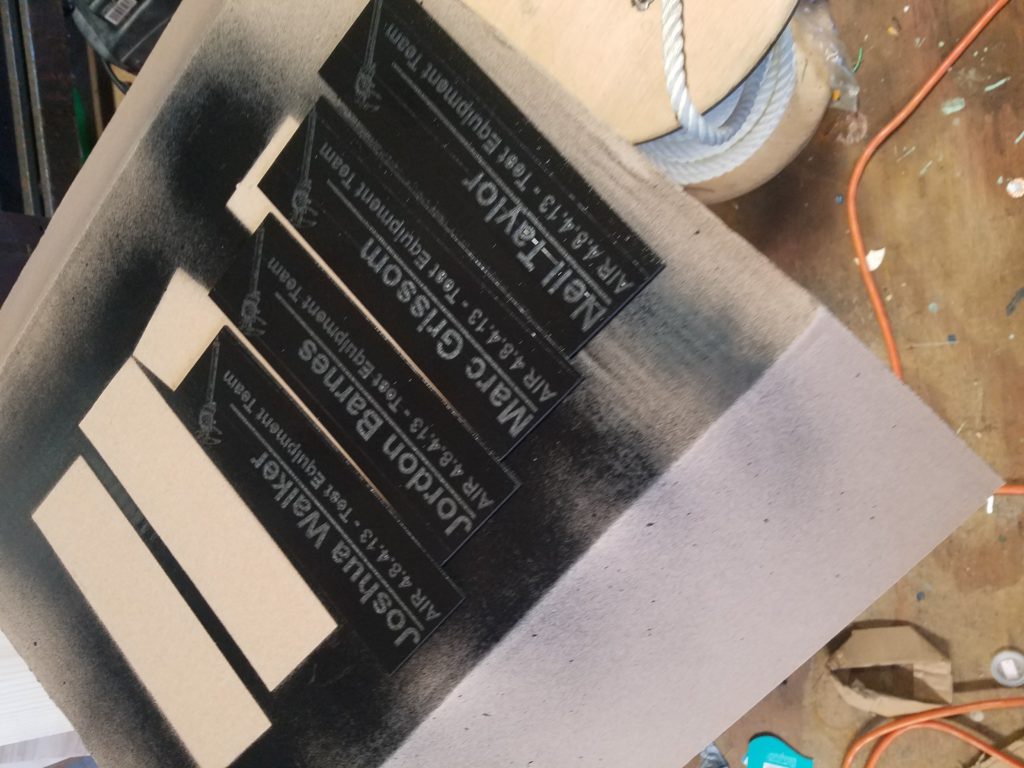
Laser cut a set of cubicle signs for my teammates at work. Backed the name tags with self adhesive Velcro. Applied painters tape over the entire plywood. Engraved and then cut. Then I painted the burnt away portions.
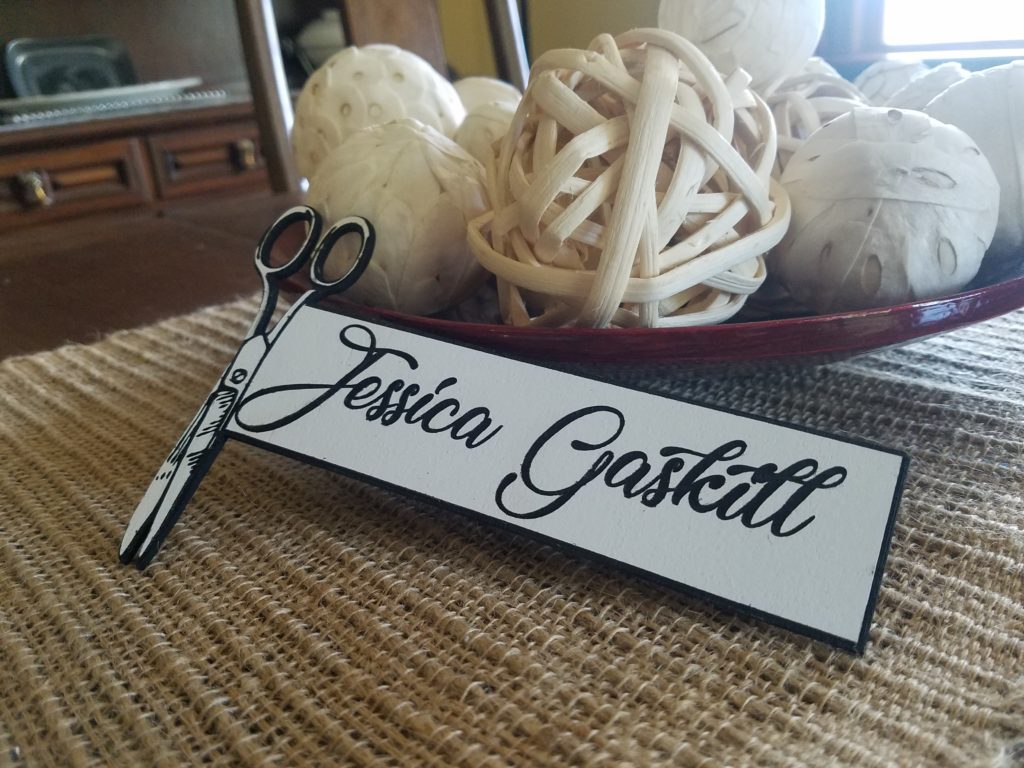
Created a custom name tag for a friend of ours whom is a hair dresser. Painted the entire plywood white. Let it dry. Covered the entire sheet of plywood in painters tape. Engraved and then cut it. Then painted the engraved parts black. The painters tape made a great stencil. Then I epoxied magnets to the back.
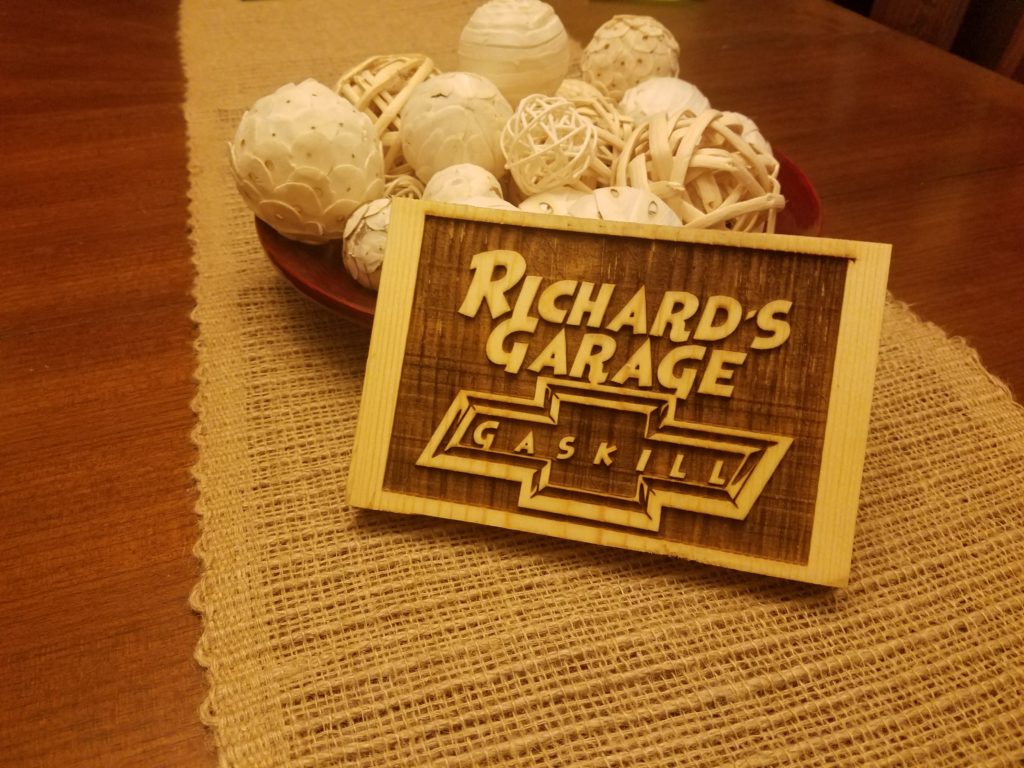
What self respecting ham, doesn’t have a call sign badge? I laser cut this badge. Bought some blank badges. Painted the entire surface black. Used the laser to vaporize the paint off, for the writing.
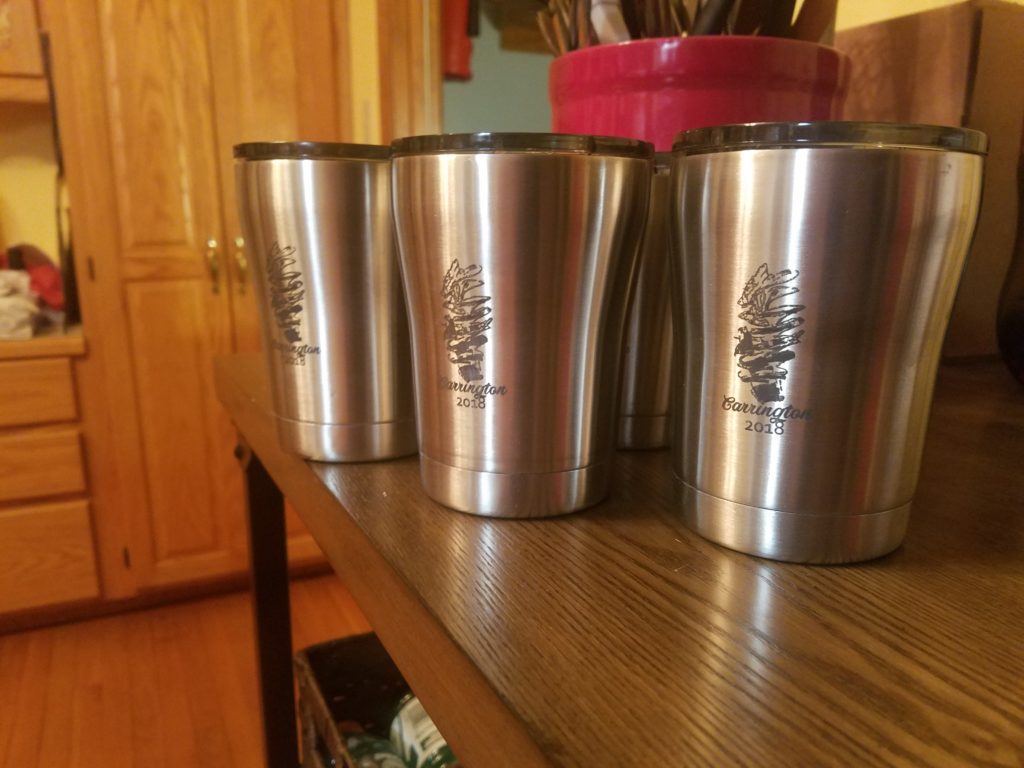
My five year old daughter drew the picture. We gave them as a gift from her to her grand-parents and great-grand-parents. Sprayed the cups with dry-molly lubricant. The lubricant sinisters the metals in the lubricant to the stainless cup. Just make sure you clean them REAL good with rubbing alcohol.
Cut some coffee mugs to be given out as Christmas presents for my wife. Figured I’d post some videos of the rough process. Some of the videos (unedited) drag out. Feel free to fast forward, or skip.
I’m using a fairly heavily modified (and contraption-ed) K-40 laser cutter.
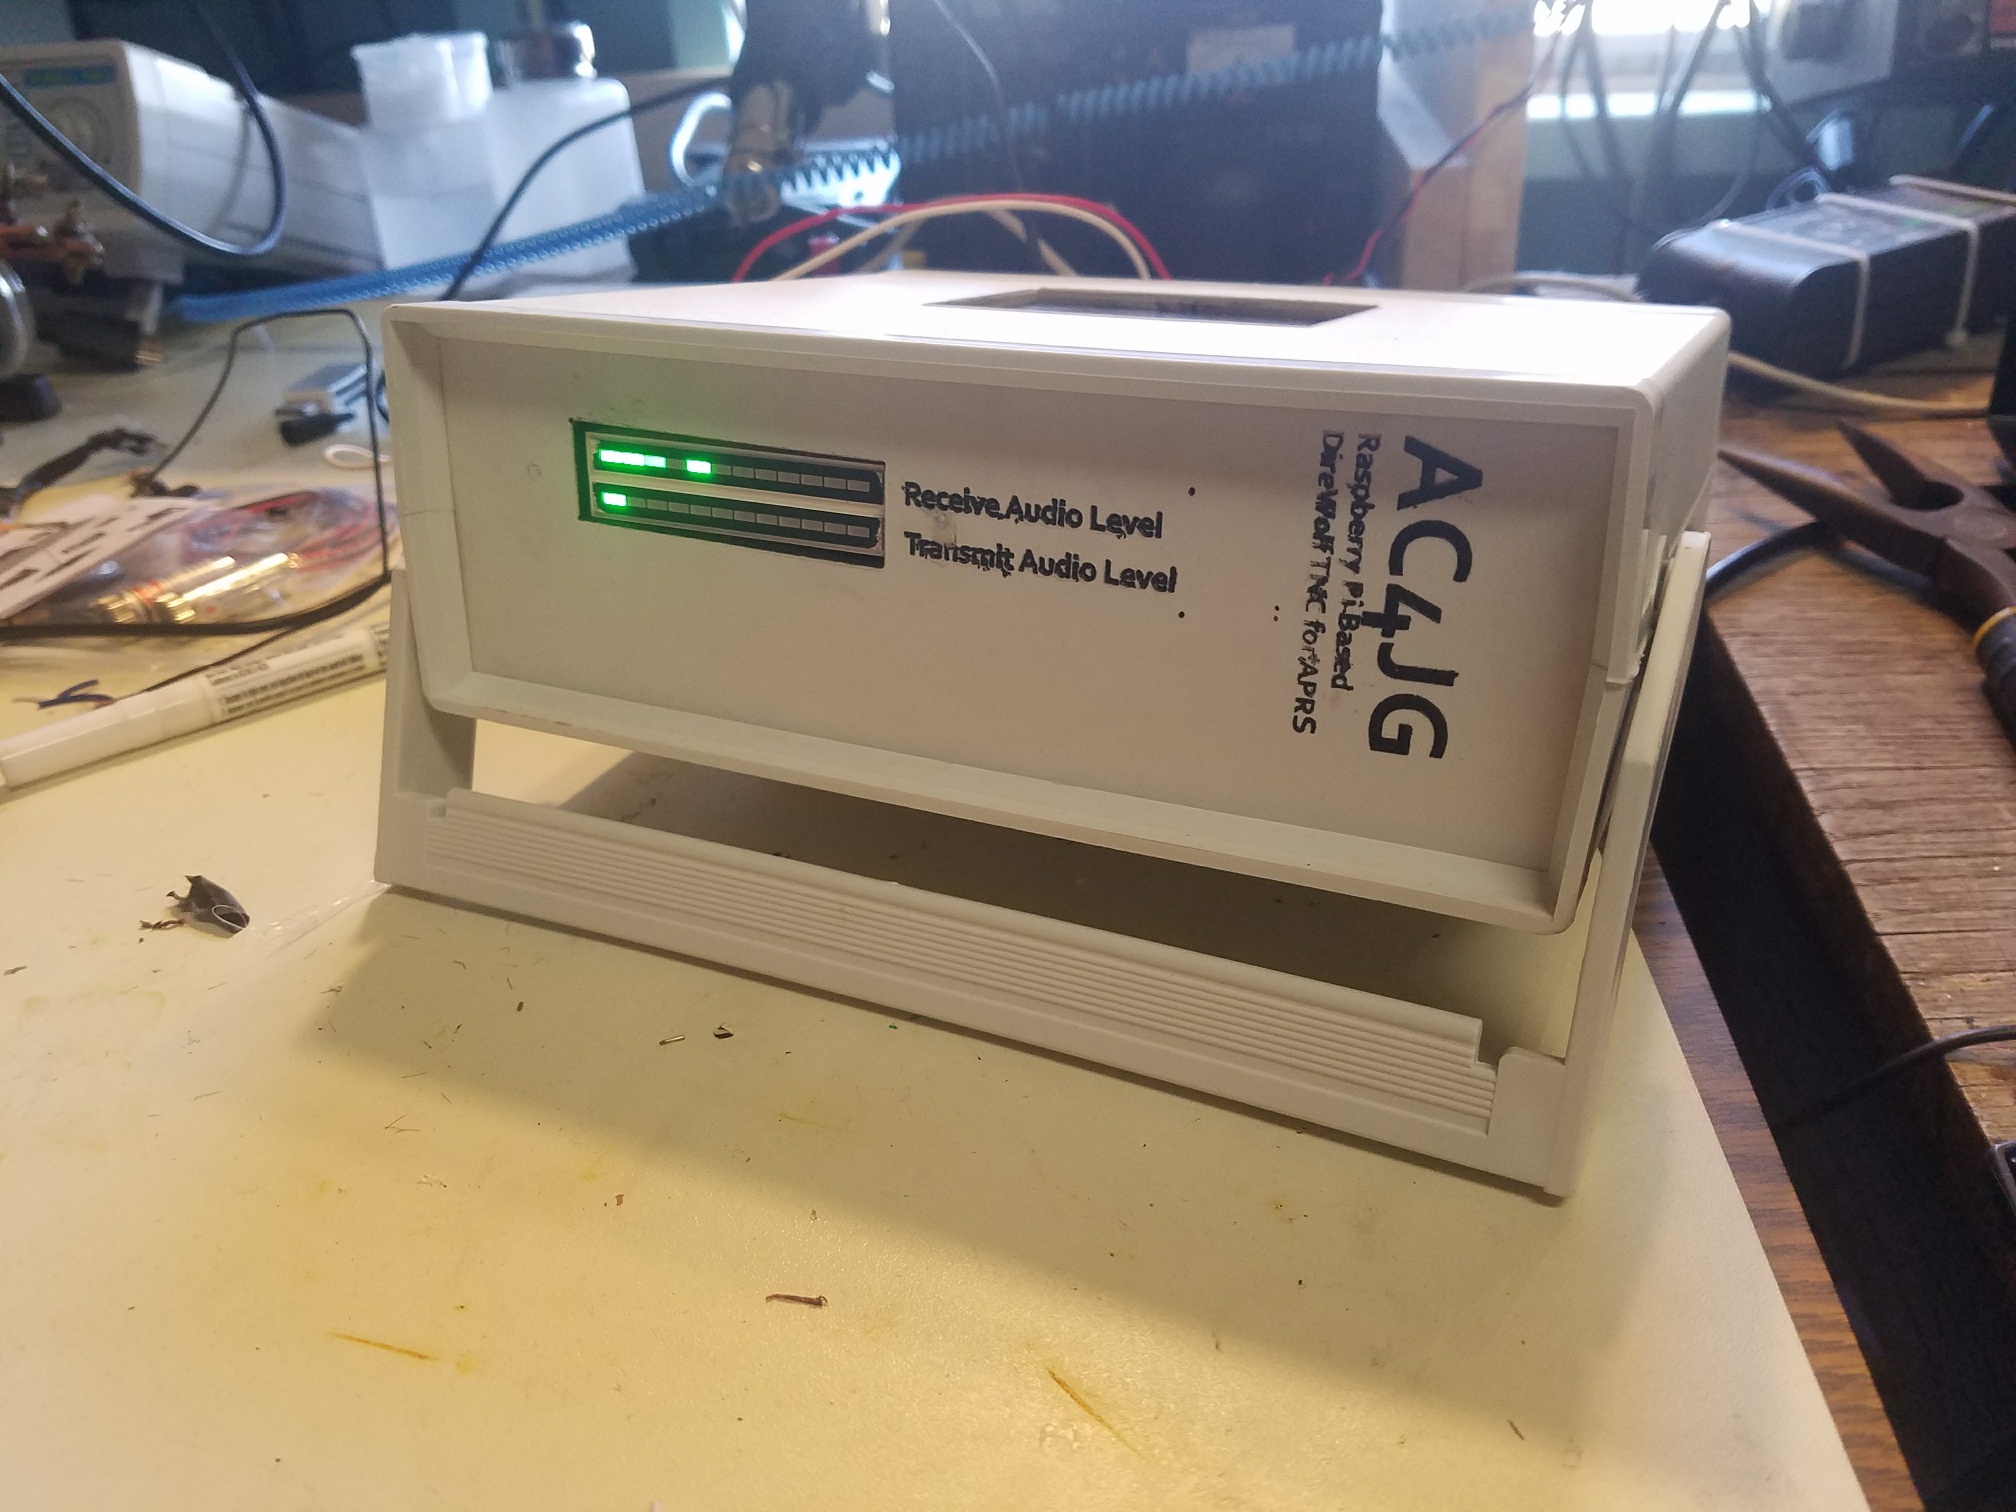
Well, I managed to take a perfectly good $15 dollar APRS I-Gate solution and make it WAY more expensive (see http://westmouthbay.com/2016/11/13/my-aprs-setup/). For some reason, I wanted to make something that looked more polished. Not sure I succeeded. The goal was to maximize functionality and minimize cost, while allowing me to be lazy, purchasing easy to manipulate modules. Of course, much more money could be saved with custom board work. But that takes effort and time I don’t have.
I do not mean for this to be a how-to, or step by step instructions. At best, the hope is to spur ideas for better versions.
You can check on the packets this thing finds first at: https://aprs.fi/info/a/AC4JG-1. Packets that other I-Gates find first, will be reported on their page, even if I hear them too.
I have fell in love with Travis Goodspeed’s hacked MD380 firmware after a fellow ham pointed to these guys. It is certainly worth messing around with if you have a MD380.
The git hub page is here. At the bottom of the page are installation instructions. It is a real good idea to review this page, and make sure you understand what is going on and you are messing with the correct radio, etc.
The big thing I see is that it allows you to load the entire DMR-MARC into the radio. That way, you see the name and QTH of just about everyone talking.
I also like the microphone bar graph. It gives a decent visual representation of your modulation. Good to find where to hold the radio.
Been meaning to write a bit about my APRS setup for a while now. Primarily, as many others have, to demonstrate how inexpensive APRS can be.
Some good discussion on what APRS is can be had here and here.
First, you can see my APRS stats, etc from aprs.fi. Nothing special.
The antenna I use is a Firestik 2MCKB that can be had on amazon.com for around $30 (this is the most expensive thing that I didn’t have lying around). The antenna tower is comprised of an old sailboat mast and is fed with some RG-11 coax I had laying around. The mast has the ability to tilt down (when hurricanes head our way) by pulling a single bolt, and unwinding the brake winch. I understand, the best I can hope for is a 1.5 SWR with RG-11, but can’t argue with free. Besides, the F-connectors I’m using are supposed to be waterproof (we’ll see).
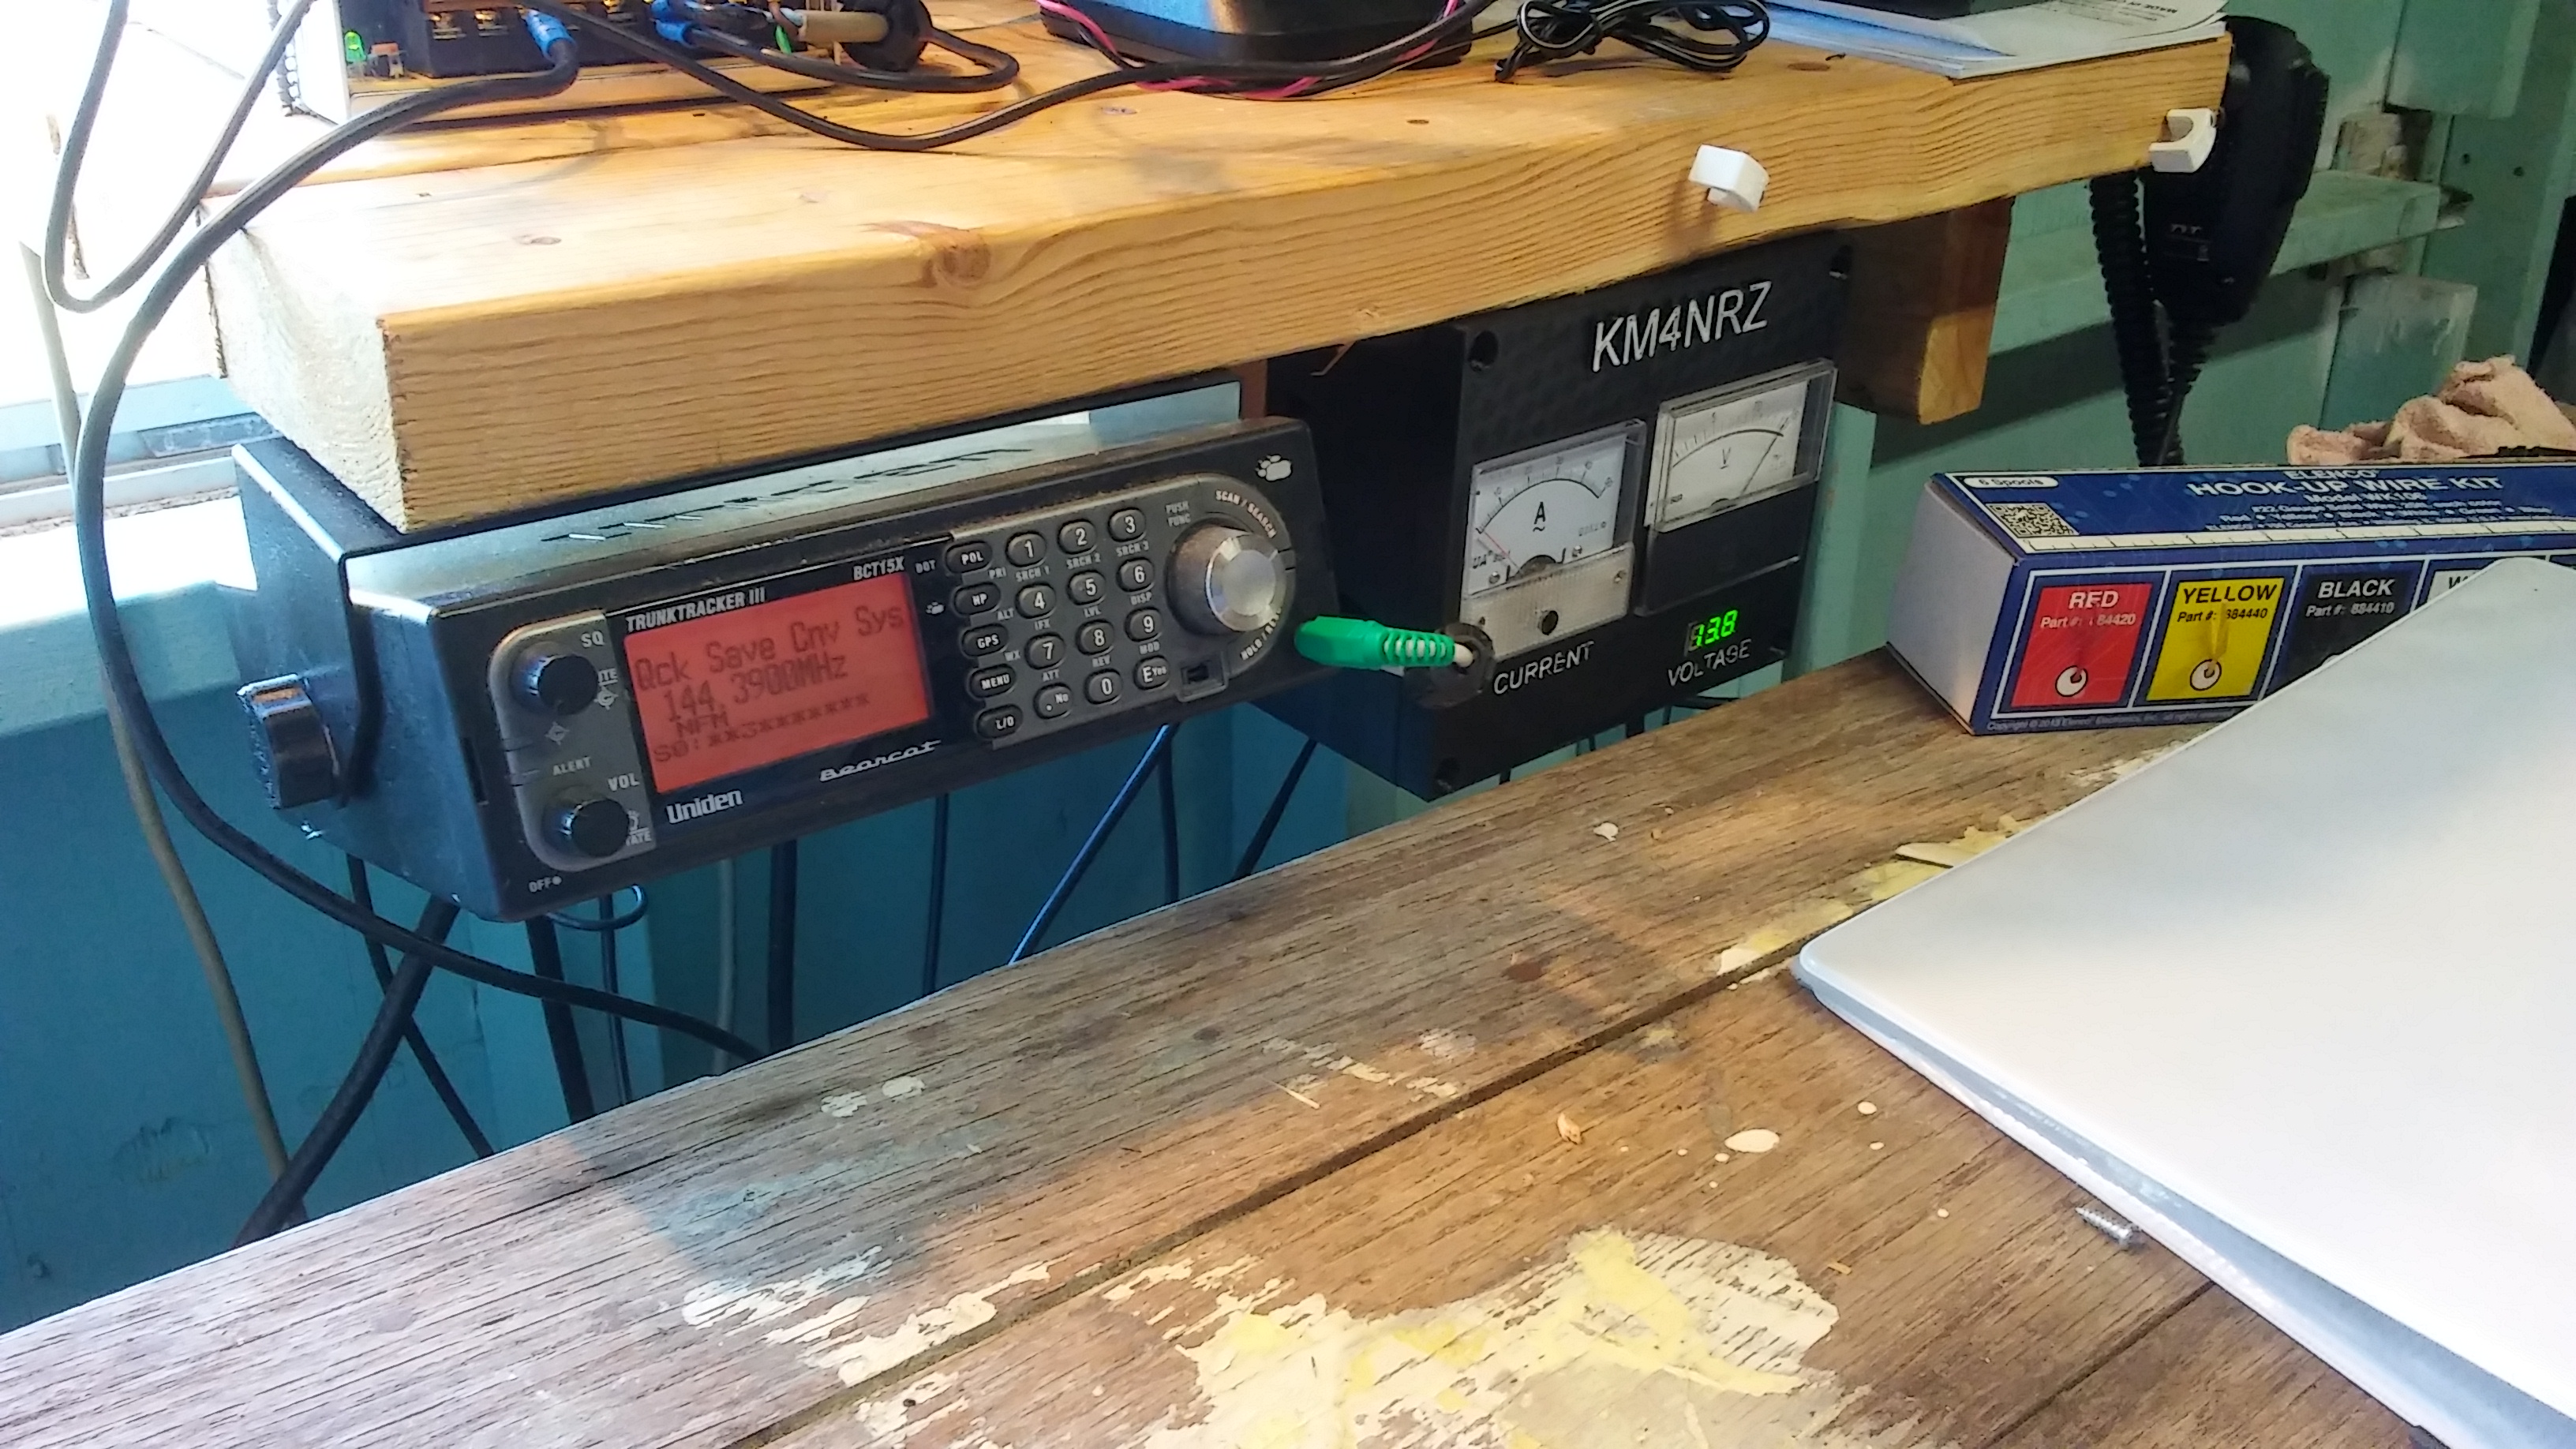
The signal then goes to an old Bearcat I have. The eventual plan is to feed it to a Baofeng, which will allow me to transmit.
The audio output (from headphone out) then goes into a $9 usb sound card, that I got off Amazon. The sound card is plugged into laptop I got for $11 via surplus auction. The laptop is running Mint Linux. I’m using direwolf to decode the APRS packets (you can see some in the terminal emulator) and YAAC for display. I’m starting to prefer YAAC over xastir as, frankly, it is prettier. This laptop is running from a bootable USB thumb drive (I was to cheep to buy a hard drive for the laptop).
Care must be used when setting the volume levels from both the scanner and the audio in (mic) levels on the usb sound card. Quieter is better.
Even though it is a fixed location (I plan to eventually put one of these in the car), I put a eight dollar USB GPS on the machine. It is running via gpsd.
This is an overview of the process I use to install the required software
sudo apt-get install direwolf
cd ~
wget https://raw.githubusercontent.com/kubostech/direwolf/master/direwolf.conf
#modify this file to suit your installation, it will be in your home directory
#go to
#https://sourceforge.net/projects/yetanotheraprsc/files/?source=navbar
and download YAAC.zip
mkdir ~/YAAC
mv ~/Downloads/YAAC.zip ~/YAAC
cd ~/YAAC
unzip YAAC.zip
Videos of my lowering my two ham radio towers. The wooden one is around 35-40′. The metal tower is around 50′ tall.
Not sure any of this is something to be duplicated by others or not. The wooden tower is much too heavy. It’s not just safe, it’s 30% safe.
Took the towers down in prep for Hurricane/TS Hermine. It shouldn’t be bad enough here to warrant taking them down, but figured it would be good practice.
I replaced the wooden tower above with the mast out of a sailboat. It is much lighter and feels much more safe.
If anyone tries something similar, don’t blame me if something goes wrong!
73, KM4NRZ (now AC4JG ).
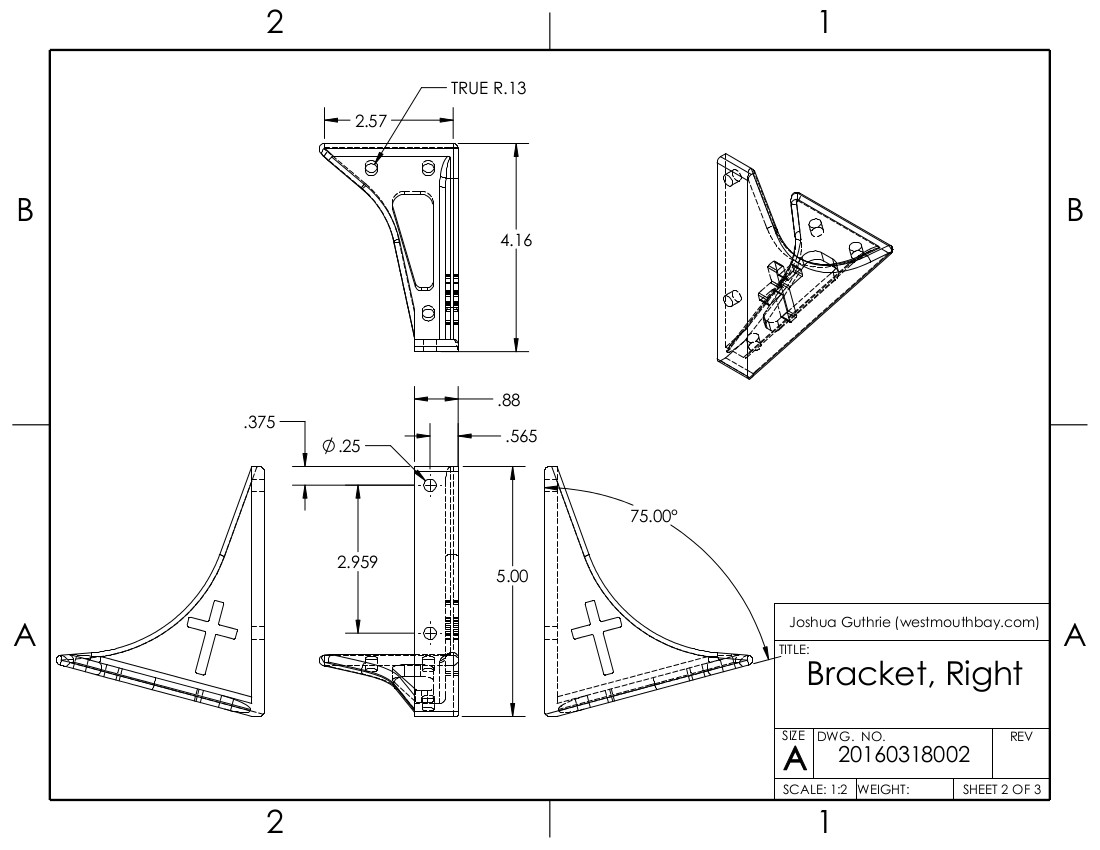
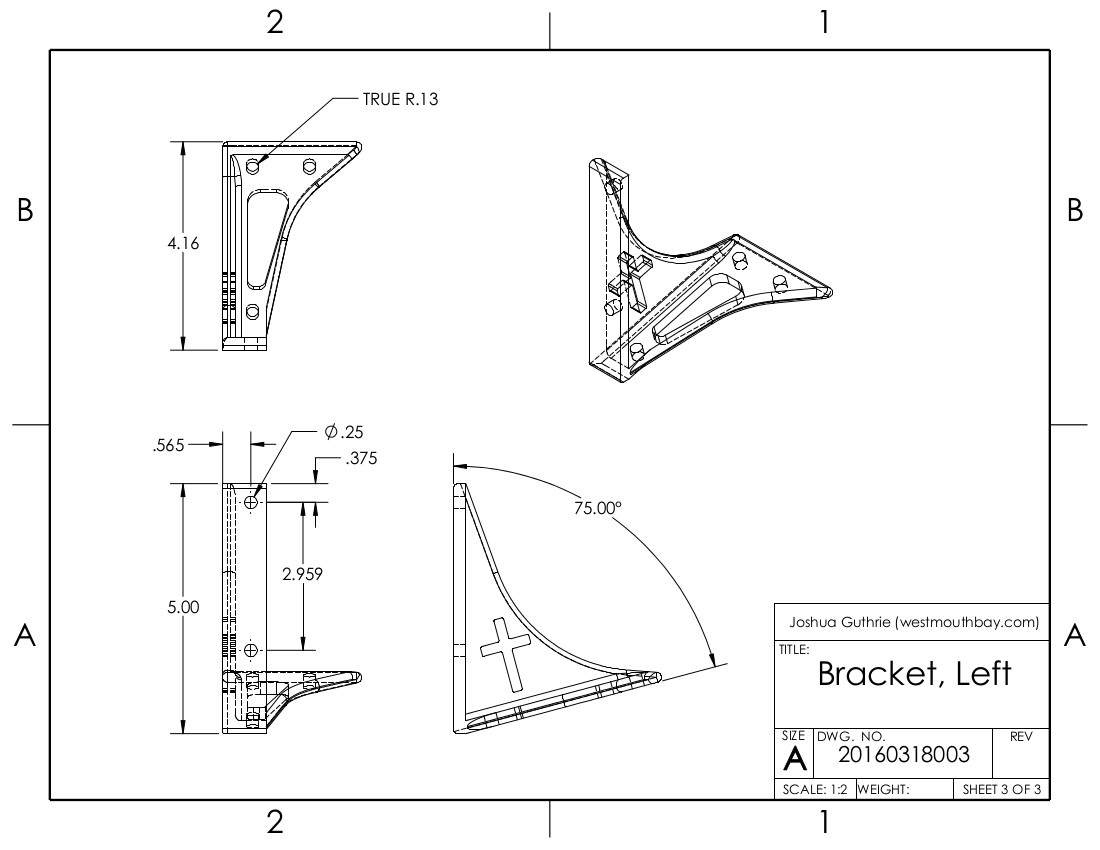
A mount for the Numark CDN77USB’s head unit we use a Church. Our setup is on a slant, so I designed the mount to account for the slant. Also, designed a decorative cross on the side.
The mount could be used for other 19″ rack-mounted hardware.
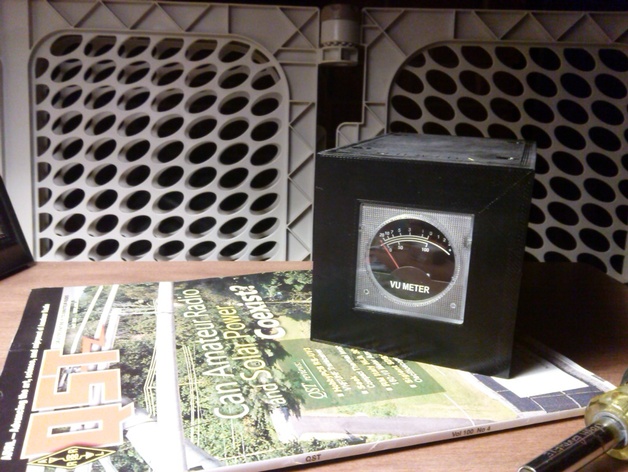
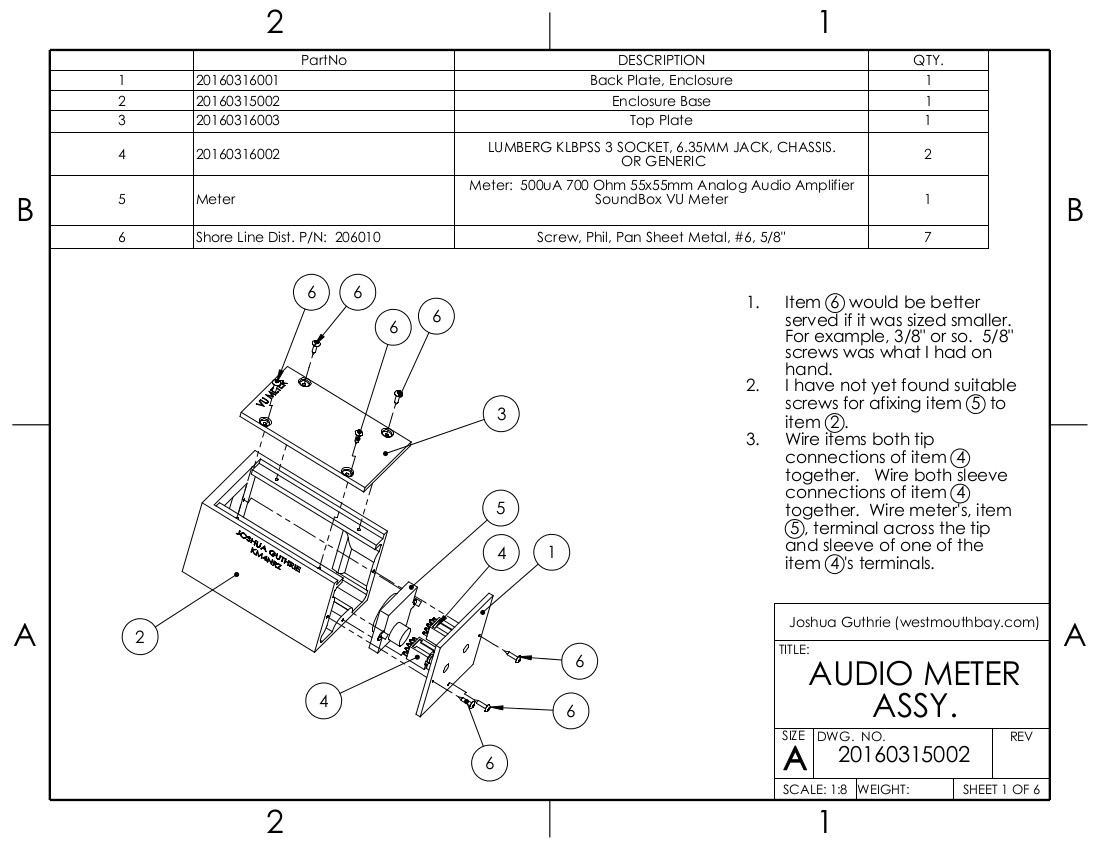
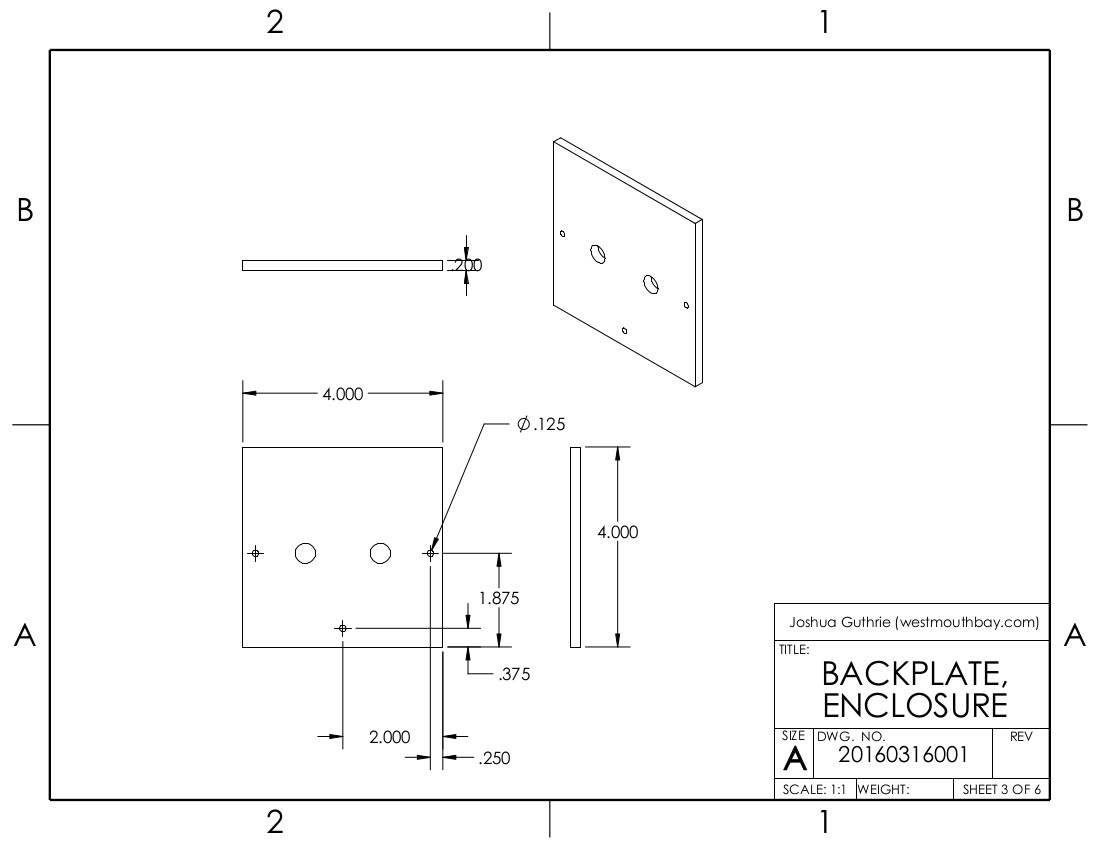
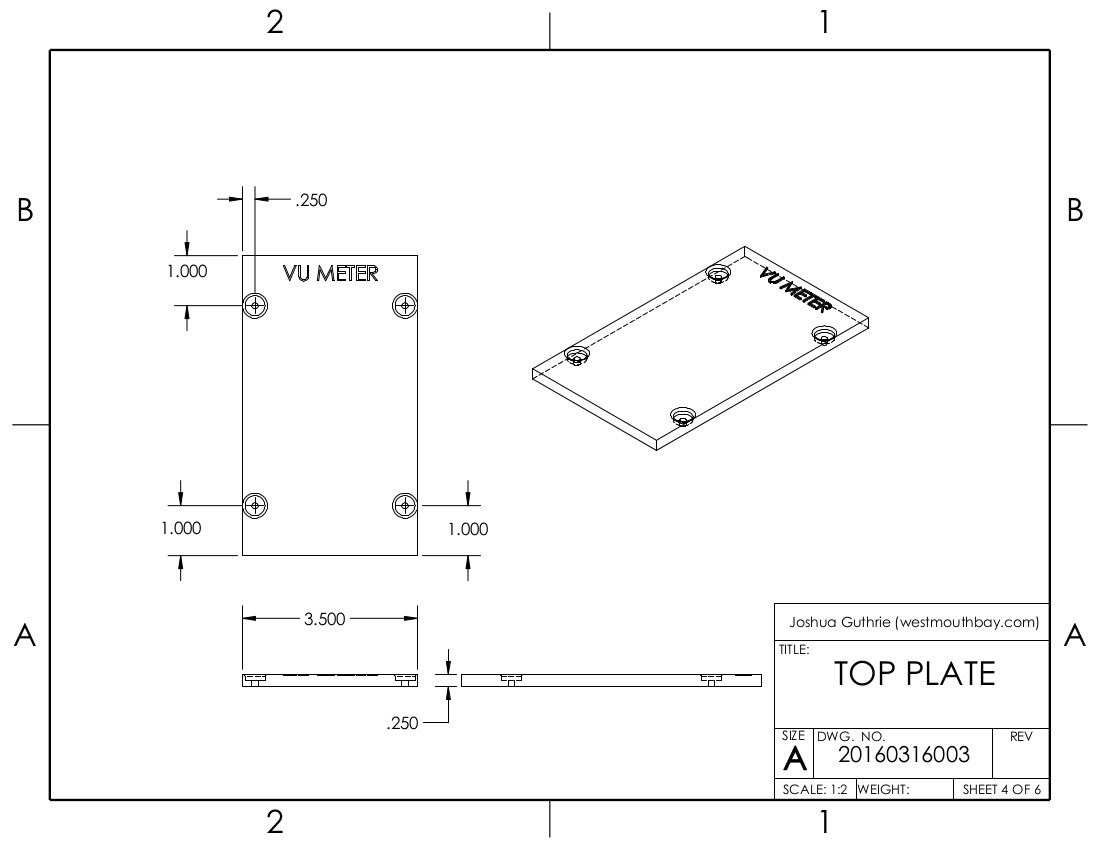
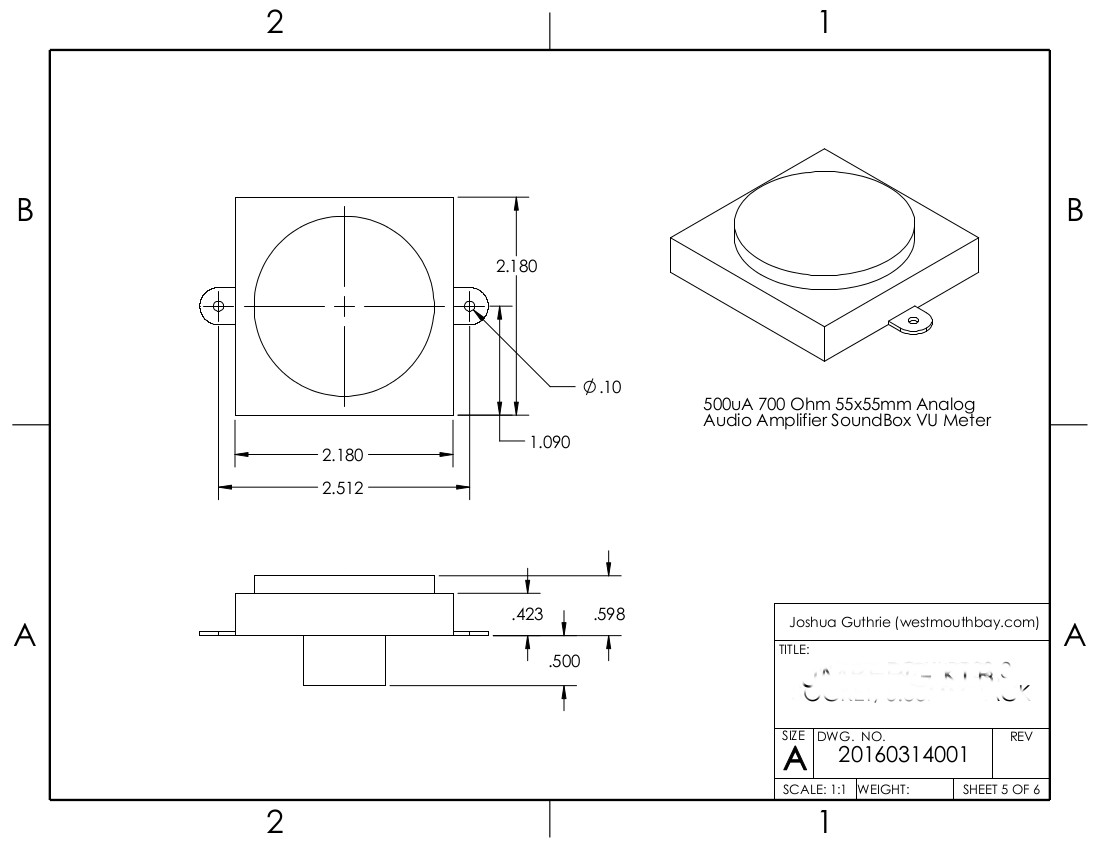
A link to a VU meter enclosure I designed. The STL files can be downloaded via thingiverse. Don’t forget you will need a cheep signal conditioner to drive the VU meter.
I’ve been asked by a few people to post pictures and give a parts list for my media center.
This is the device I plug into my TV so I can watch movies and TV shows on it. I just select the movie/TV show I want, and wha-la. It does a good job of automatically downloading cover art from the internet and giving brief plot summaries. Read the rest of this entry »
Our first launch of a sugar rocket on a stick. By all right, it should not have been launched without a parachute. However, we have perfect visibility for a mile circle, and launched at an angle to keep it away from us. Don’t do this. We’ll not do this again, ourselves.
Shortly after launch, we had our first PVC glue failure. The end cap blew off. I think the fuel had too fast of a burn rate (too hot). When this happened, it the motor ripped itself from the stick. Despite this, we got a max altitude of aprox 400 ft. I know the flight isn’t strictly parabolic, but it’s by best guess.
(16 ft/sec^2) * (0.5*10sec)^2 = 400′
Launch site is over water. Nearest house is about one mile away. Motor was found, after splashing through about 2′ of water, nose down, embed in packed sand about 2 inches about 600′ from the launch site. This was way too close for me, next time will increase the angle of launch tube. Will add those bath water dyes for children, to make it easier to spot.
Our first 2.2 oz motor. Also our first test with my homemade data acquisition system and at Otway. It is arduino based connected to a in-expensive load cell. Beats the heck out of reading the scale one frame at a time. See the test plan for a more detailed desc of the thrust measurement rig.
This is the test that prompted our forced re-location to our field in Otway. This re-location makes us use less than 2.2 oz of propellant per the ATF regs (have to transport it) for now on. Reminder, if you do this stuff, make sure you understand the laws. I wouldn’t image federal explosives charges would be any fun at all. Recommend talking to your field agent.
The kitty litter end cap failed. We half expected it to. The cheaper kitty litter didn’t feel right when I packed it. It shot a wad of propellant 50-75 ft into the air where it just floated around until it burnt off. Pretty actually. When the end cap failed, it caused the motor to get ejected from the stand. Pretty dangerous actually. Glad we were way the heck away from it.
Another Nozzle failure (aka, complete failure). Nozzle consisted of steel washer held in place via cement and PVC fittings. Steel washer moved 90 degrees and came out. Also bad batch of fuel. Neat light show though. Another smoke bomb.
Nozzle failure. No thrust. Nice smoke bomb though. By the way, I don’t light motors this way any more! I’ve since moved up to electrical ignition using nichrome wire, a straw LOOSELY filled with black powder.
Allison and myself went up the lighthouse on the 21st. A great trip. I took a series of pictures and stitched them together into panoramas. Most were stitched from 10-20 pictures. Used huggin to stitch them together. Great software. They are in link form (as thumbnails don’t give them justice). You will want to zoom in with your browser.
Here’s the time lapse from Harkers Island, NC to Lexington Park, MD. Was a drive up for work.
Created with a cheap webcam (moved up to a cheap HP webcam) connected to a MacBook running Gawker. The mount consisted of a wooden spoon held to the rearview mirror using a clamp and zip-ties.
Time lapse video taken from Dayton, Ohio to Harkers Island, North Carolina. Less than 30 mins total about 12 hours drive time. The sun rises about four minutes into the video (if the night is unbearable, fast forward 4:00). You can see it set about 15 minutes later. A whole day of driving compressed into less than 20 minutes.
The route was out of Ohio, through West Virginia, Virginia, than through NC. A large portion of it was though the Appalachian Mountains. If you look carefully at the video you can see it starting to sleet, then snow for a period.
Click “The Read the Rest of the Entry” to see.
Created with a cheap webcam (Dynex® – 1.3MP Webcam) connected to a MacBook running Gawker. Created two iterations of custom mounts. The first was created out of PVC with holes cut so the head rest of the car’s seat could pass though it. The second was a wooden spoon held to the rearview mirror using a clamp and zip-ties.