Ammo Can Raspberry Pi Media Center
I’ve been asked by a few people to post pictures and give a parts list for my media center.
This is the device I plug into my TV so I can watch movies and TV shows on it. I just select the movie/TV show I want, and wha-la. It does a good job of automatically downloading cover art from the internet and giving brief plot summaries.
The software I use is http://openelec.tv/. You burn the disk image to a SD card and plug it into the Pi. This is basically a dedicated Linux distribution that runs the XBMC (X-box Media Center) — now OpenELEC.
My media center runs on a Raspberry Pi. The Raspberry Pi is a credit card sized system on a chip based computer. It provides it’s own video, sound, USB, etc. It has a handy HDMI output for sound and video. They run about $35 and can be found at Allied Electric, and a few other places. It only draws about 2 watts and is powered via USB.
I like the Pi because:
- It is a full fledged computer that has a $35 price tag.
- It consumes very little power. No need for heat sinks, fans that make noise. You can leave it on 24/7 without ‘seeing’ it on your electric bill.
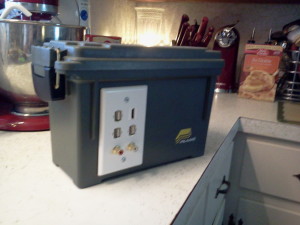
I used an ammo can for my enclosure. I’ve used ammo cans for enclosures since high school. They are fairly inexpensive, and easy to cut. I’ve fell in love with the plastic Pelco cans. Real easy to cut. I then dressed it up with USB, HDMI, and component keystones. I connected the finished device to a USB hard drive and a USB hub. I connected a dongle for a wireless mouse and a wireless network card to the hub. The wireless NIC is a ASUS (USB-N10). Do research before purchasing a NIC. Not all of them are compatible. One could just as easily get a ethernet keystone and not mess with the wireless. I didn’t have this option.
I control the device either via computer interface (simply go to the IP address of the box), via the mouse, or via the Yetse Android/I Pod app (which is pretty cool).
Internally, I connected the parts together via USB cables. I had most around the house. The rest I picked up at the Dollar Tree. The Pi is powered via Micro USB. You will probably need a USB A to Micro USB B adaptor, depending in the keystone you use. I use the upper left USB keystone for dedicated power and use a standard USB charger for the supply.
My Raspberry Pi OpenElec XMBC media center:
The parts follows:
| Desc | Webpage | Cost | Comments |
| Raspberry Pi | http://www.alliedelec.com/lp/120626raso/ | $35.00 | |
| Icarus Keystone Style Wall Plate – 6 Ports | http://www.amazon.com/gp/product/B0047ZFHF2/ref=oh_details_o06_s01_i01?ie=UTF8&psc=1 | $2.21 | |
| Plano Ammo Can (Field Box) | http://www.amazon.com/gp/product/B004W3WC84/ref=oh_details_o06_s01_i00?ie=UTF8&psc=1 | $10.46 | Now less expensive at Wal-Mart |
| Icarus RCA Keystone Insert Audio Left and Right | http://www.amazon.com/gp/product/B0047ZFKU4/ref=oh_details_o06_s00_i00?ie=UTF8&psc=1 | $6.95 | Don’t need this if you run HDMI |
| Keystone Jack – USB A Female to A Female Coupler Adapter, Flush Type (White) | http://www.amazon.com/gp/product/B001TC9BOO/ref=oh_details_o05_s00_i00?ie=UTF8&psc=1 | $4.95 | Need at least two, I used three. |
| HDMI Keystone Coupler, Snap-in for Wallplate, White | http://www.amazon.com/gp/product/B0039L3P86/ref=oh_details_o03_s00_i00?ie=UTF8&psc=1 | $5.99 |

